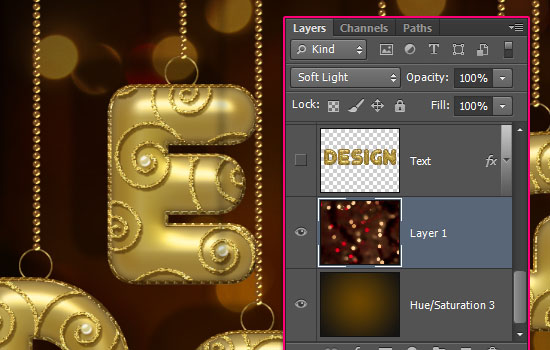
السلام عليكم
شرح بالانجليزى والصور توضح جيدا

الخطوة الاولى
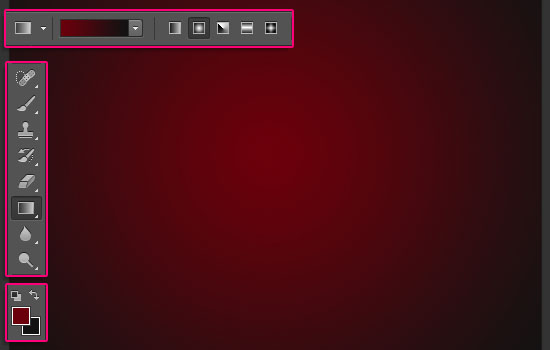
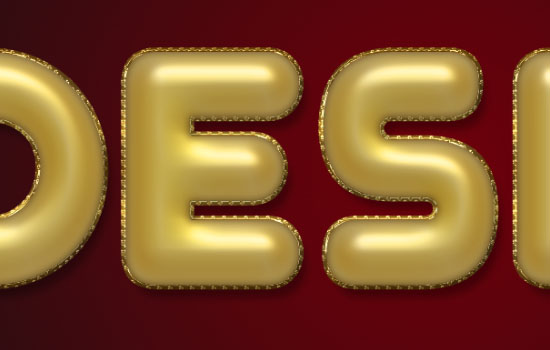
- Create a new 1280 x 1024 px document. Set the Foreground color to #6a000c and the Background color to #111111. Pick the Gradient Tool, choose the Foreground to Background, Radial Gradient, in the Options bar. Then click and drag from the center of the document to one of the corners
- Create the text using the font “Junegull”. The color is #f9df78 and the font Size is 428 pt.
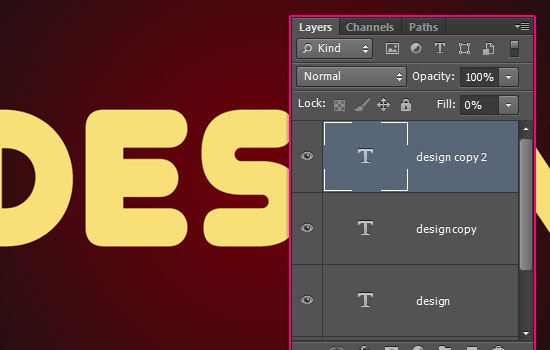
Duplicate the text layer twice, and change the second copy’s Fill value to 0.
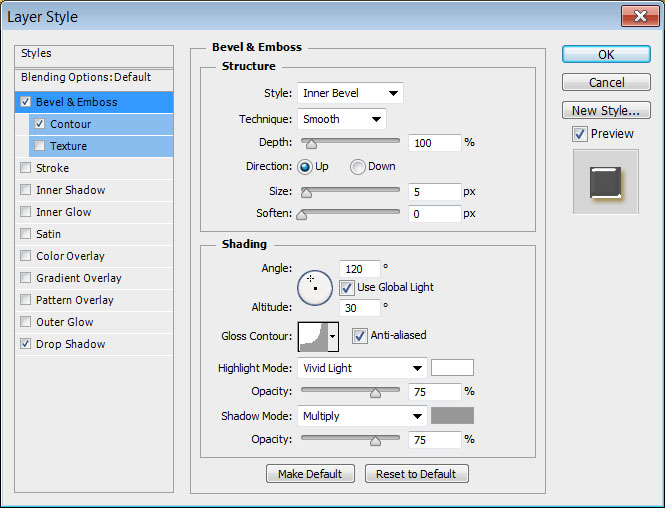
الخطوة الثانية
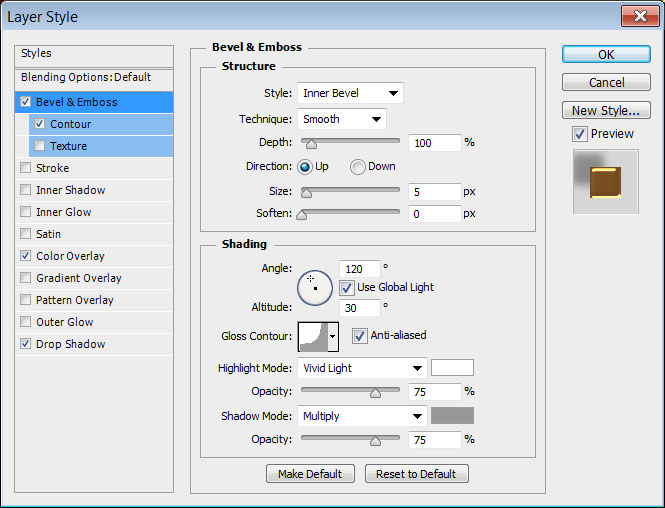
Double click the original text layer to apply the following Layer Style:
– Bevel and Emboss
Style : Stroke Emboss
Depth : 250
Gloss Contour : Ring – Double
Check the Anti-aliased box
Highlight Mode : Linear Light
Shadow Mode – Color : #96794b

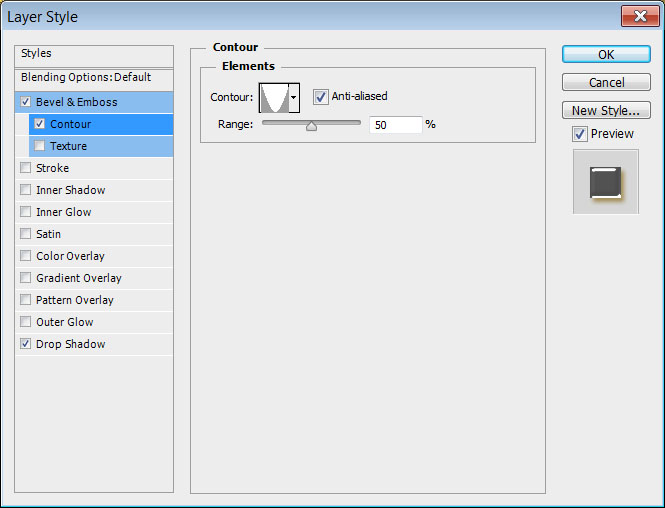
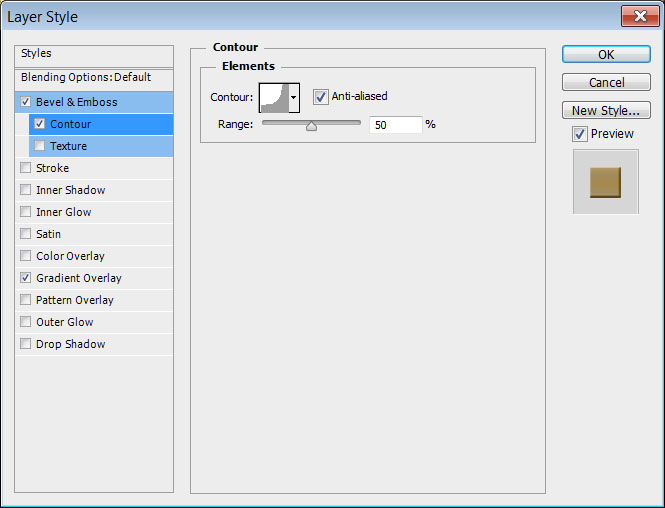
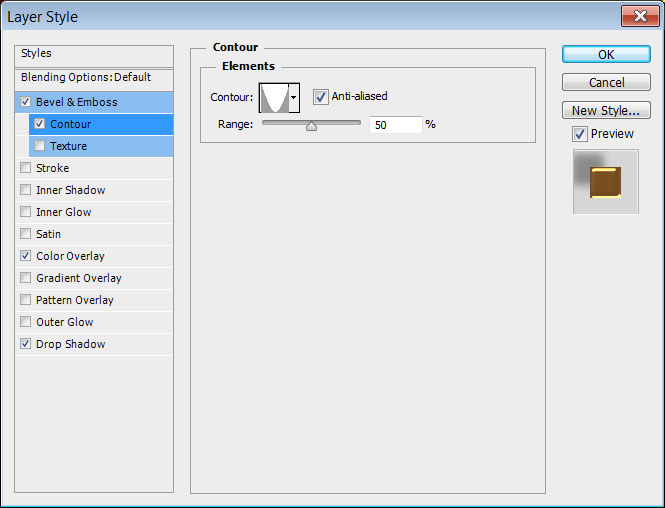
– Contour
Contour : Cove – Deep
Check the Anti-aliased box
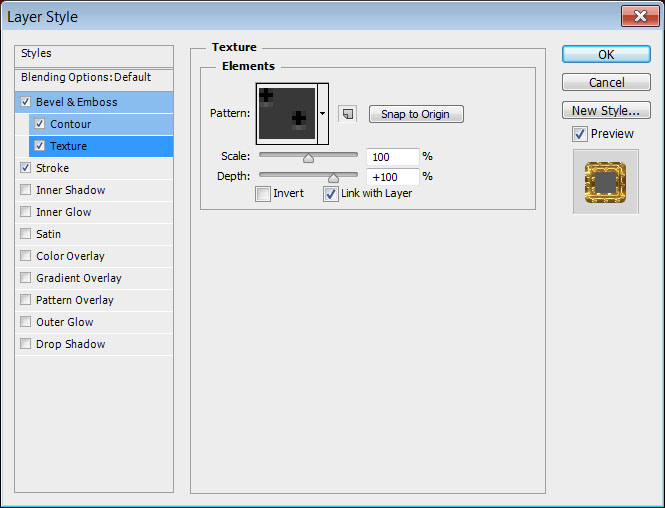
– Texture
Pattern : Carbon fibre
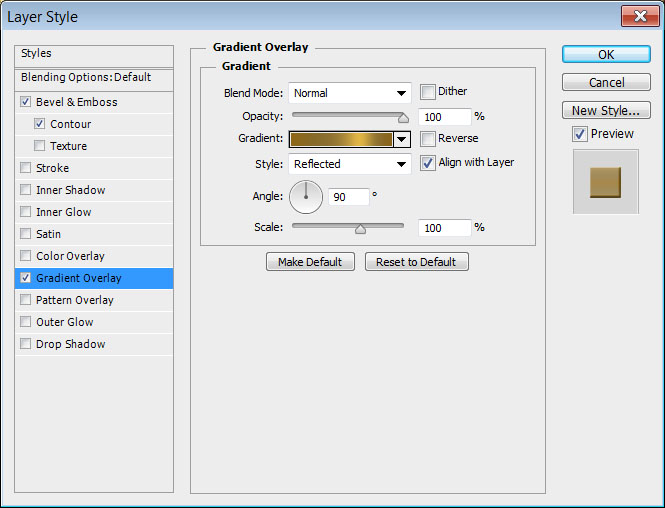
– Stroke
Size : 10
Position : Center
Fill Type : Gradient – “Gold 24k – 20L”
Style : Reflected
Angle : 90
Check the Reverse box
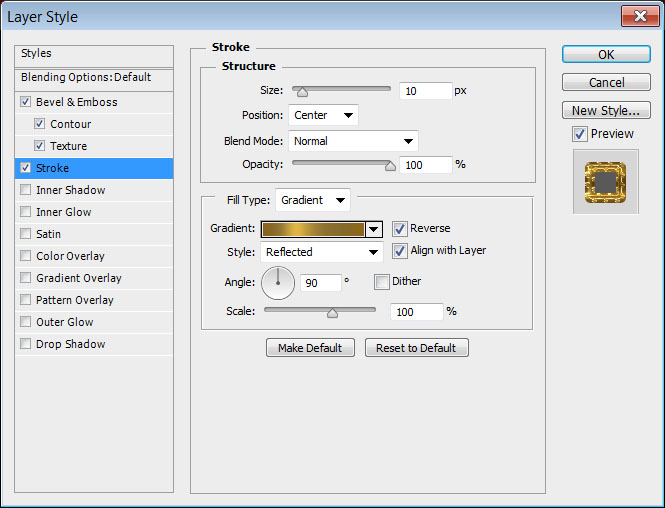
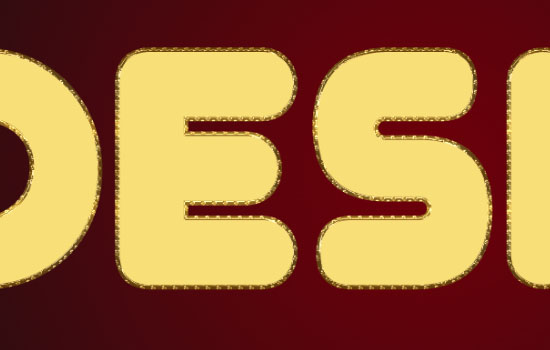
- This will create the outer stroke of the text.
الخطوة الثالثة
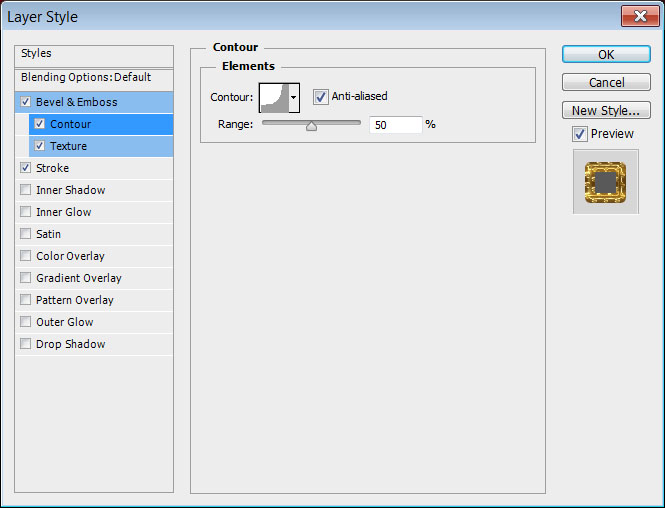
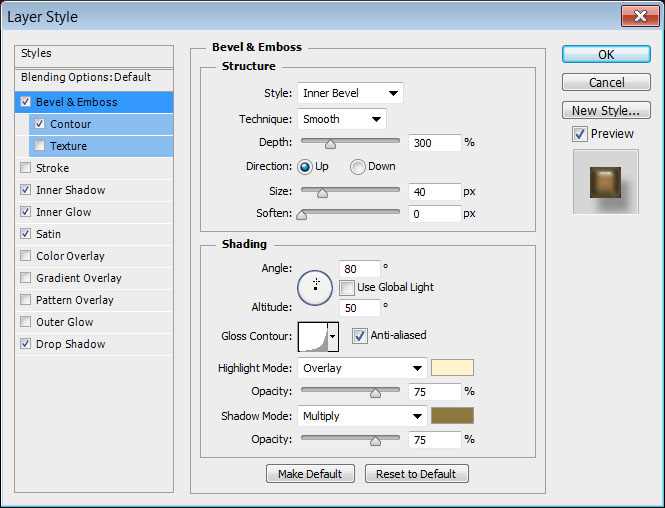
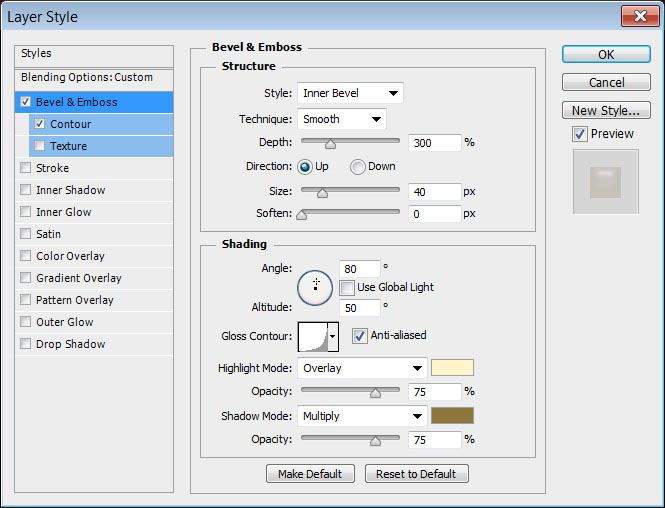
Double click the first copy text layer to apply the following Layer Style:
– Bevel and Emboss
Depth : 300
Size : 40
Uncheck the Use Global Light box
Angle : 80
Altitude : 50
Gloss Contour : Log
Check the Anti-aliased box
Highlight Mode : Overlay
Color : #fff5cc
Shadow Mode – Color : #8c773d
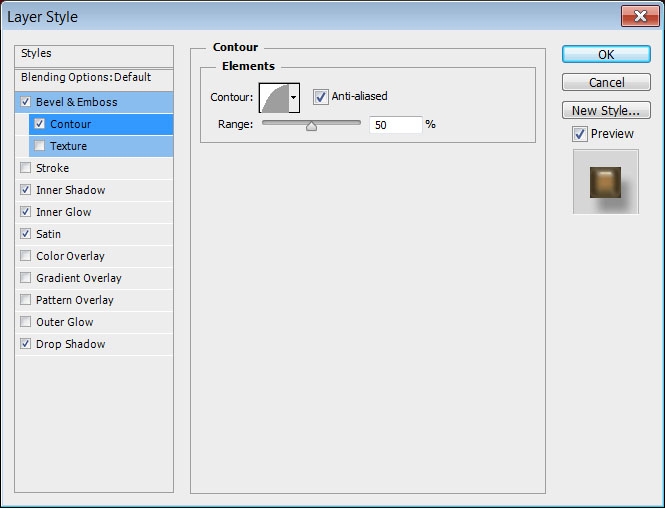
– Contour
Contour : Half Round
Check the Anti-aliased box.
– Inner Shadow
Color : #5c401b
Distance : 0
Size : 10
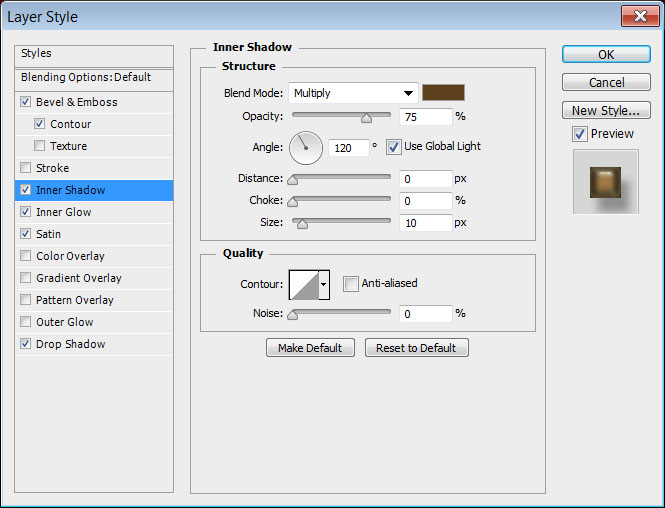
– Inner Shadow
Color : #5c401b
Distance : 0
Size : 10
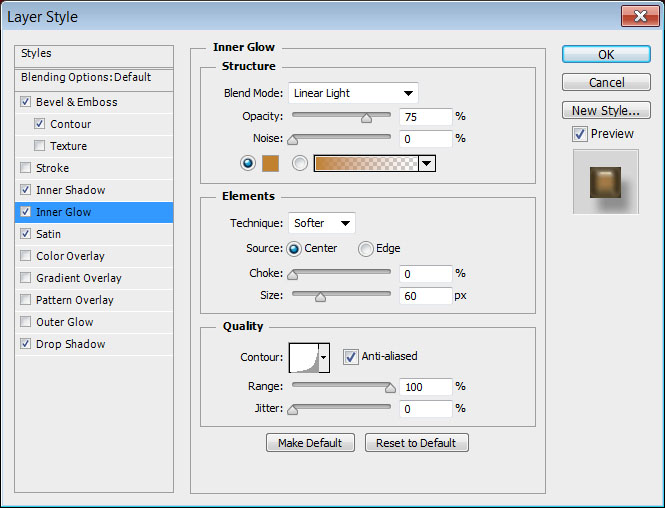
– Inner Glow
Blend Mode : Linear Light
Color : #c1812e
Source : Center
Size : 60
Contour : Log
Check the Anti-aliased box
Range : 100
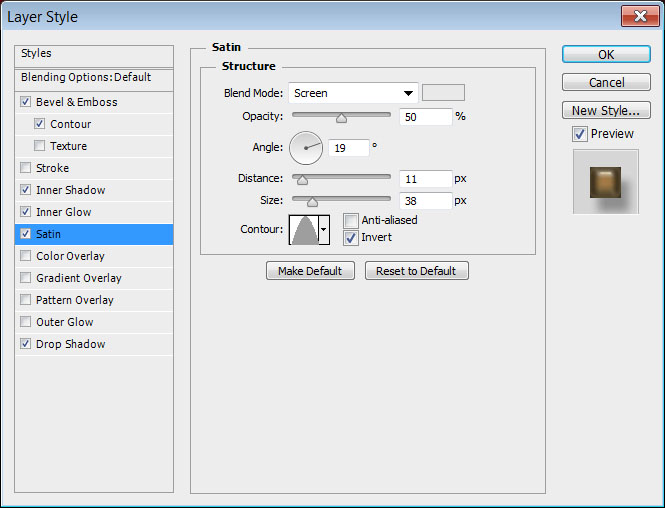
– Satin
Blend Mode : Screen
Color : #e9e9e9
Size : 38
Contour : Cone
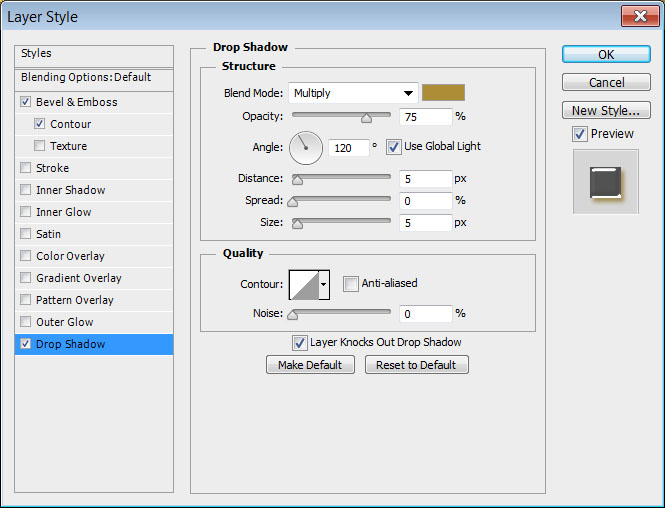
– Drop Shadow
Color : #8e8e8e
Distance : 16
Size : 10
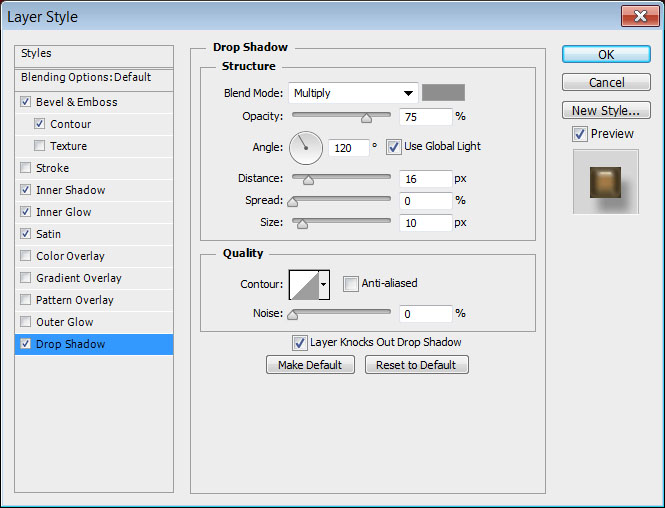
This will create the glossy metallic layer of the effect.
الخطوة الرايعة
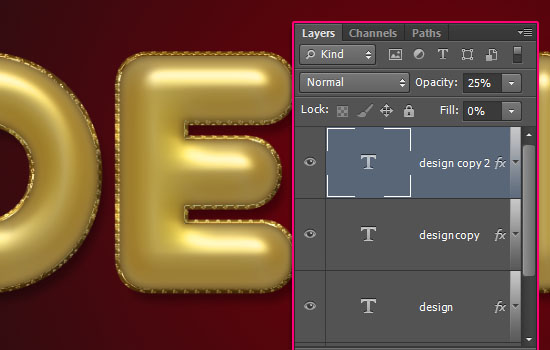
Double click the second copy text layer to apply the following Layer Style:
– Bevel and Emboss
Depth : 300
Size : 40
Uncheck the Use Global Light box
Angle : 80
Altitude : 50
Gloss Contour : Log
Check the Anti-aliased box
Highlight Mode : Overlay
Color : #fff5cc
Shadow Mode – Color : #8c773d
– Contour
Contour : Half Round
Check the Anti-aliased box.

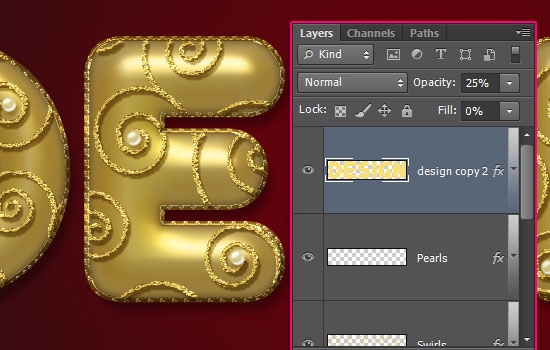
Change the second copy layer’s Opacity to 25%. This will add a subtle glossy layer that will intensify the highlights and shadows a little bit more.
الخطوة الرابعة
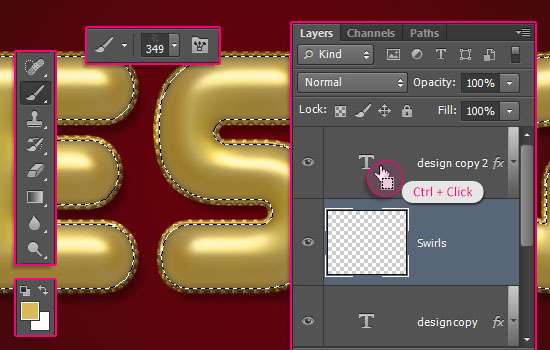
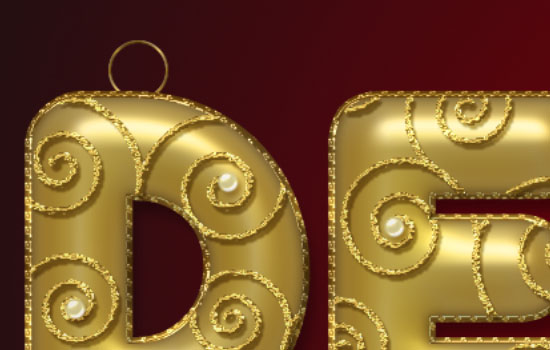
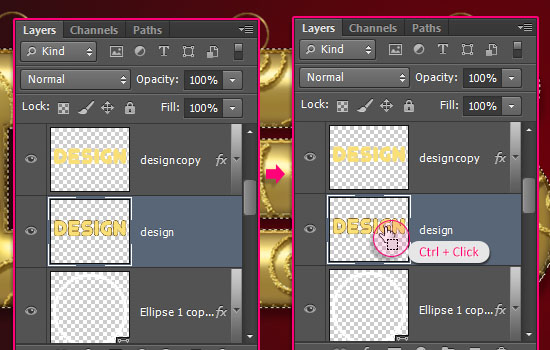
- Ctrl/Cmd + click any text layer’s thumbnail to create a selection, create a new layer right below the second copy text layer and call it “Swirls”, set the Foreground color to #dbb858, pick the Brush Tool, and choose the “6a” brush tip from the “floral swirls brushes” pack.
- You can open the Brush panel (Window -> Brush), and change the tip’s Angle while you’re using the brush next to create some variation.
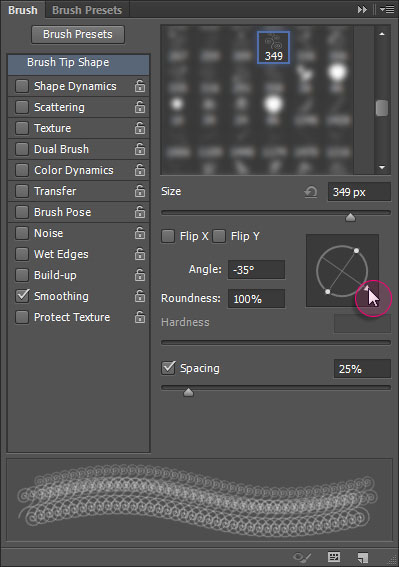
- You can also change the tip’s Size as you like, then, start clicking to fill the selected area with the swirly decorations. Keep in mind that you can use the Eraser Tool to remove any unwanted parts, then refill them again, as well as using different brush tips from the pack.
Once you’re done, go to Select -> Deselect to get rid of the selection.
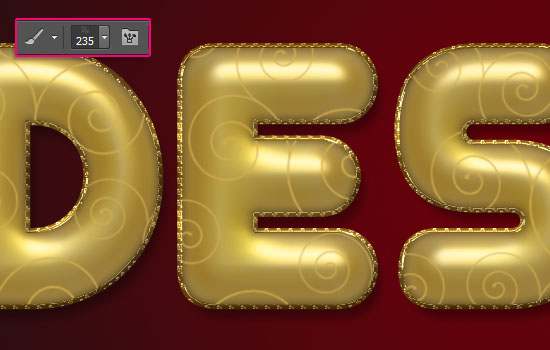
- Double click the “Swirls” layer to apply a Stroke effect by changing the Size to 1 and the color to #dbb858.
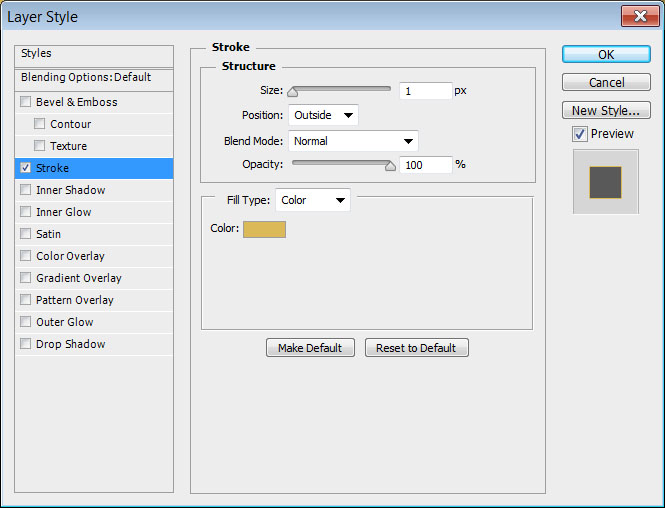
- This will thicken the swirls, and create some jagged edges, which will be great for creating the glitter-like appearance next.
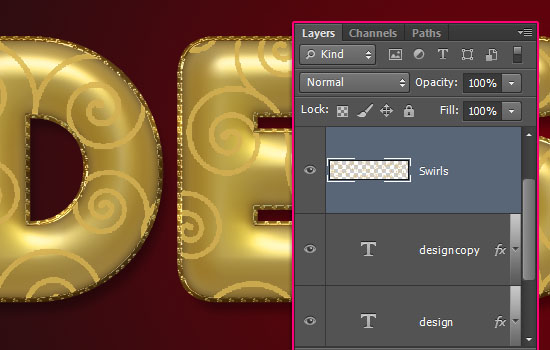
To be able to style the stroke, we must rasterize it with the layer’s content
To do so, go to Layer -> Rasterize -> Layer Style if you are using CS6+ versions, or, Layer -> Group (to put the “Swirls” layer in a group), then Layer -> Merge Group to resterize the layer. Rename it to “Swirls” once again.
الخوة السادسة
Double click the “Swirls” layer to apply the following Layer Style:
– Bevel and Emboss
Gloss Contour : Ring – Double
Check the Anti-aliased box
Highlight Mode : Vivid Light
Shadow Mode – Color : #5d4700

– Contour
Check the Anti-aliased box.
Range : 80%

– Texture
Pattern : Leather 1
Depth : 355%
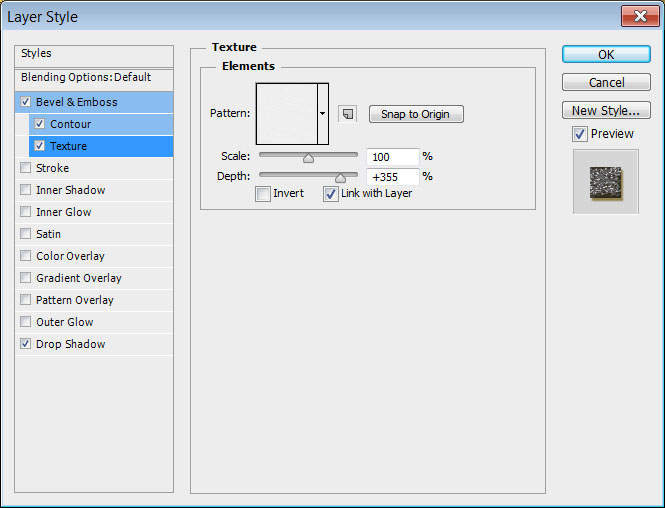
– Drop Shadow
Color : #91772f
Distance : 4
Size : 2
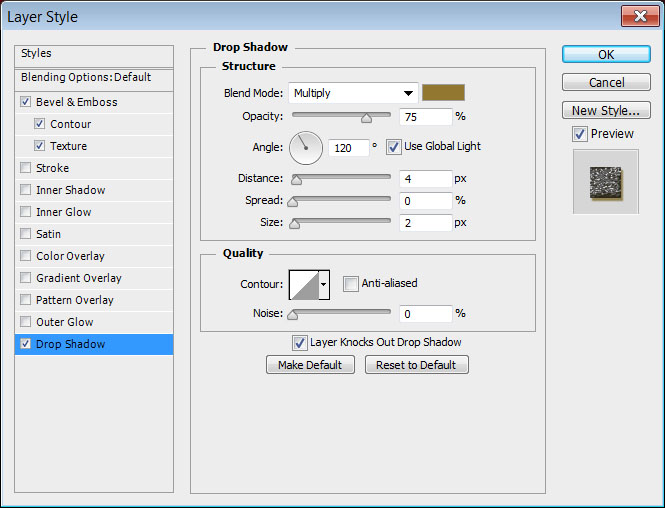
- This will style the glittering swirls.
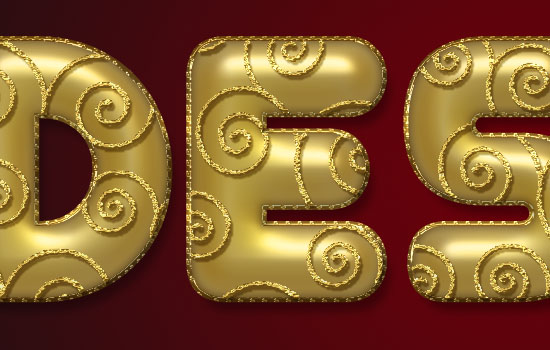
الخطوة السابعة
- Create a new layer on top of the “Swirls” layer and call it “Pearls”.
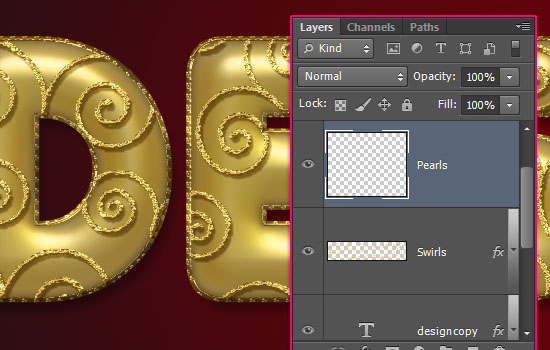
Double click the “Pearls” layer to apply the following Layer Style:
– Bevel and Emboss
Gloss Contour : Cove – Deep
Check the Anti-aliased box
Highlight Mode : Vivid Light
Shadow Mode – Color : #979797
– Contour
Contour : Cove – Inverted
Check the Anti-aliased box.
– Drop Shadow
Color : #ae8d37
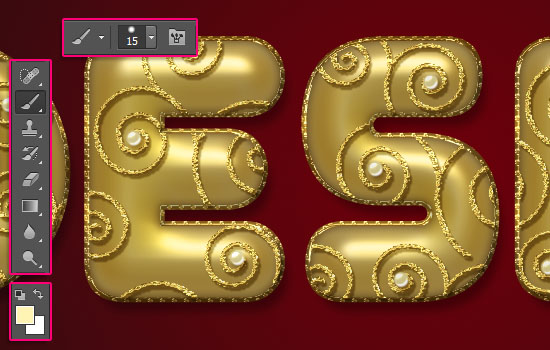
- Pick the Brush Tool, choose a 15 px hard round brush tip, set the Foreground color to #fff4b4, and start dotting some pearls inside some of the swirls you created.
- Note: In the next step, we are going to rasterize and merge the layers, which means they won’t be editable anymore, and you will not be able to access or modify their Layer styles either.
So if you want to keep a copy of the original layers, save a copy of the document you’re working on before you continue with the tutorial.
For each text layer you have, select it then go to Layer -> Rasterize -> Type.
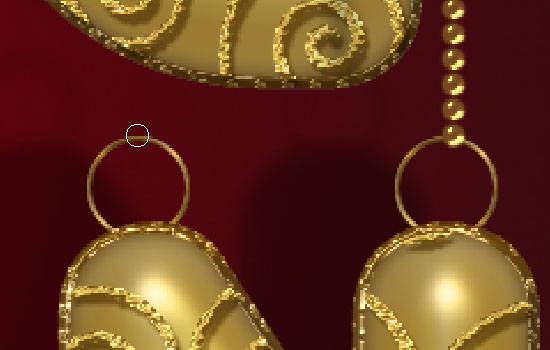
الخطوة الثامنة
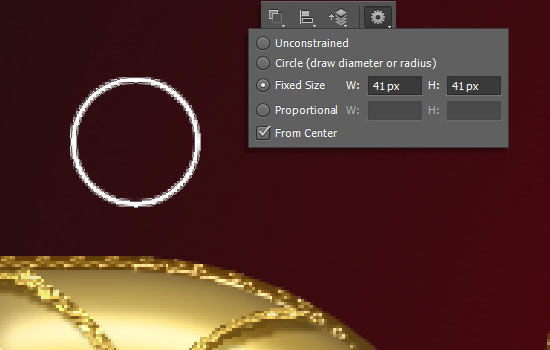
Pick the Ellipse Tool, choose the Shape option in the Options bar, and click the “Geometry Options” icon. Choose “Fixed Size”, and type in 45 for both the W and H values (Width and Height), then check the “From Center” box.
Click and drag slightly to create the first circle.
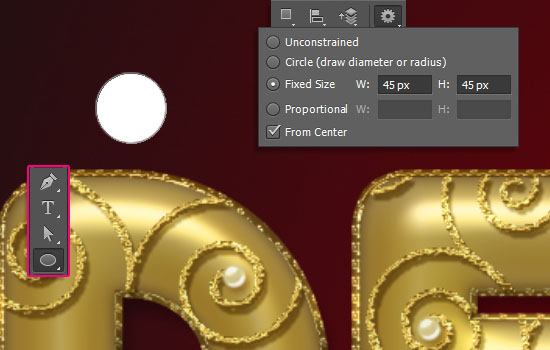
- Change the Fixed Size values to 41, choose the “Subtract Front Shape” option, then click and drag to place the smaller circle inside the bigger one and release to subtract it.
Make sure to place the resulting shape layer right below the original text layer.
uble click the ring shape layer to apply the following Layer Style:
– Bevel and Emboss
Gloss Contour : Gaussian
Check the Anti-aliased box
Highlight Mode : Hard Light
Shadow Mode – Color : #272100
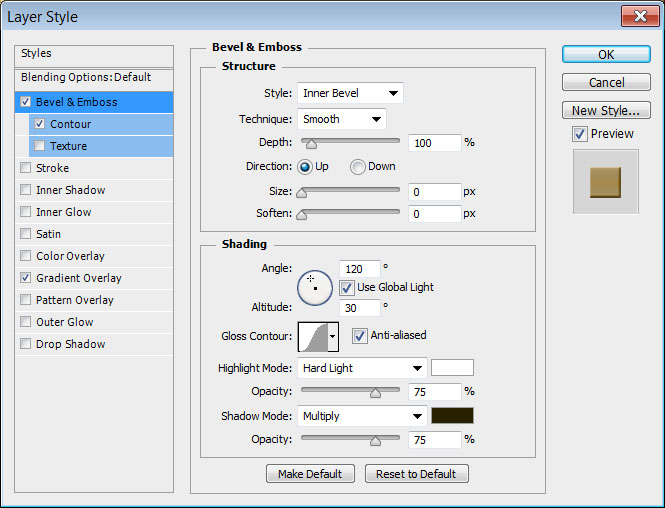
– Contour
Contour : Cove – Deep
Check the Anti-aliased box.
– Gradient Overlay
Gradient : Gold 24k – 20L
Style : Reflected
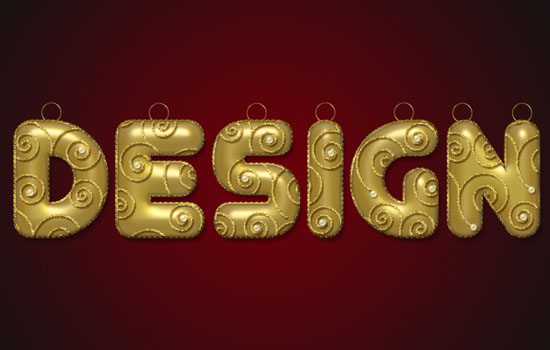
- This will style the ring.
- Duplicate the ring shape layer then move the copies to place them behind each letter.
(With the Move Tool selected, press and hold the Shift key, then press the Right Arrow Key a couple of times to move the rings. this will make sure to keep all the copies at the same horizontal level.)
الخطوة التاسعة
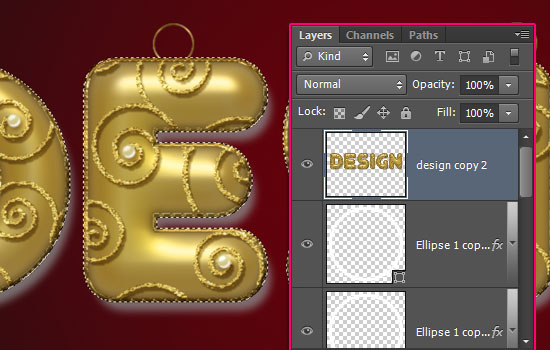
- Select the rasterized original text layer, then go to Layer -> Rasterize -> Layer Style (or group it and merge the group if you’re using < CS6 versions). Then, Ctrl/Cmd + Click its thumbnail to create a selection.
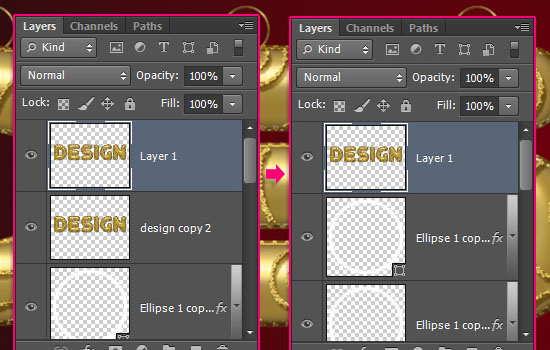
- Select all the layers except for the ring and Background layers, then go to Layer -> Merge Layers. You’ll notice that the Drop Shadow of the first copy text layer looks bright. That’s because when the layers are merged, the Blend Modes are ignored (for the transparent areas).
- Since we don’t need the shadow outside the selection anyway, we’re going to remove it. So press the Ctrl/Cmd + J keys to duplicate the selected part in a new layer, and delete the layer that has the shadow.
Now select all the layers except for the Background layer, and merge them once again (Layer -> Merge Layers).
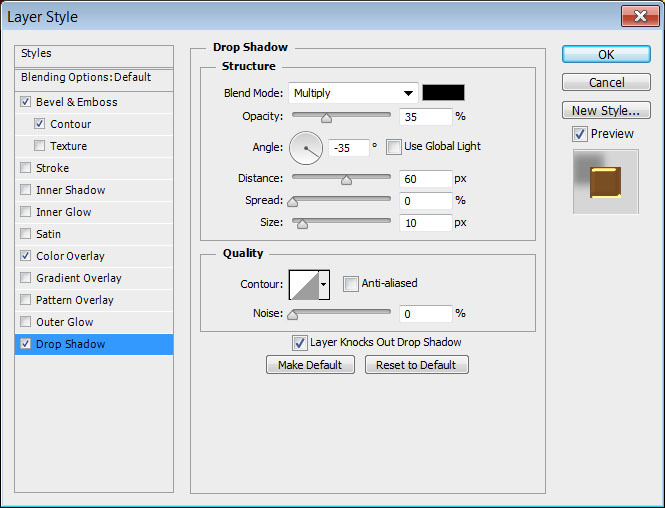
Double click the merged layer to apply a Drop Shadow effect:
Opacity : 35%
Uncheck the Use Global Light box
Angle : -35
Distance : 60
Size : 10

- This is what you should get:
الخطوة العاشرة
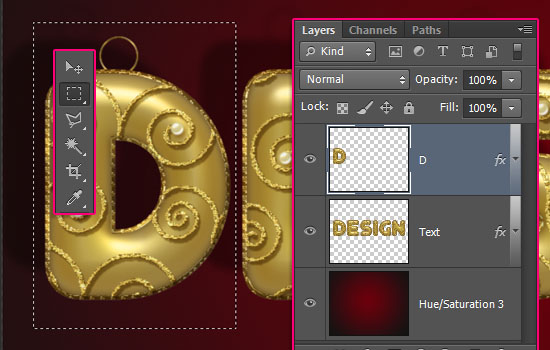
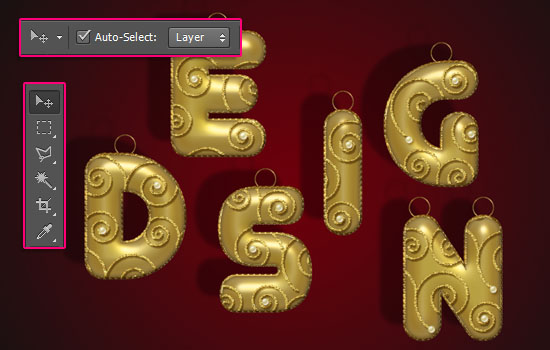
- When you’re done, make the main text layer invisible by clicking the eye icon next to it.

- Pick the Move Tool, check the Auto-Select: box in the Options bar, and choose Layer. This will enable you to click and drag the letters and move them around as you like in the scene.
Don’t forget to un-check the Auto-Select: box when you’re done with the tutorial ; )
- Create a new layer on top of all layers and call it “Lines”.
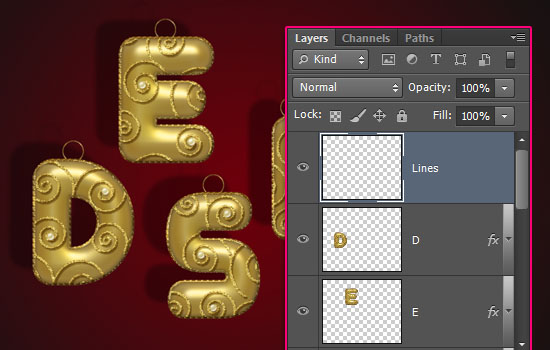
الخطوة 11
Double click the “Lines” layer to apply the following Layer Style:
– Bevel and Emboss
Gloss Contour : Cove – Deep
Check the Anti-aliased box
Highlight Mode : Vivid Light
Shadow Mode – Color :#979797
– Contour
Contour : Cove – Inverted
Check the Anti-aliased box.
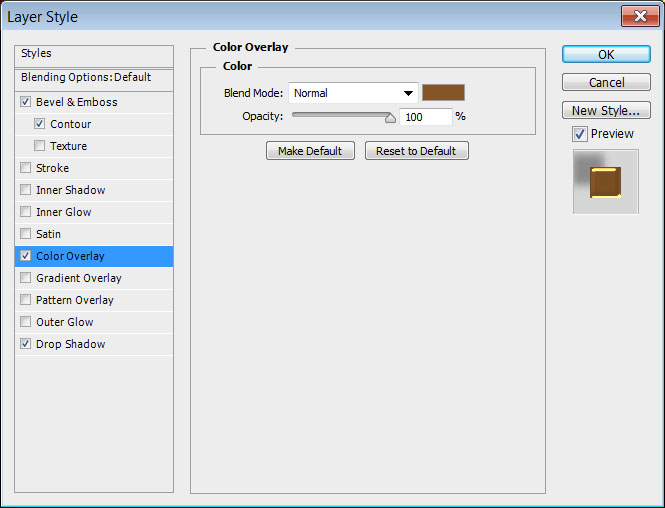
– Color Overlay
Color : #855526
This is the effect you can come back to to change the color of the strings if you like.
– Drop Shadow
Opacity : 35%
Uncheck the Use Global Light box
Angle : -35
Distance : 60
Size : 10
- Pick the Brush Tool, choose a hard round 10 px brush, and in the Brush panel, set the Spacing value to 110%.
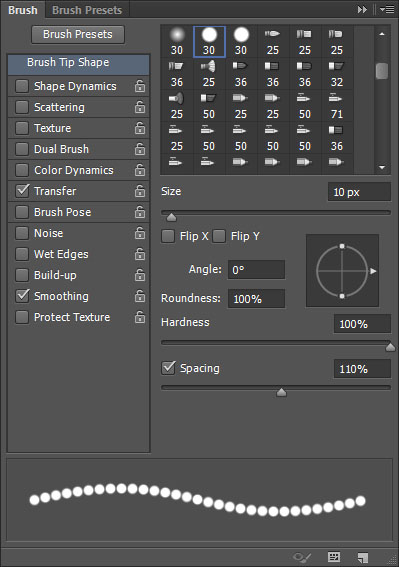
- For each ring you have, click placing the brush tip closer to its top, then press and hold the Shift key, and drag the mouse upwards until you reach the edge of the document.
Make sure to release the Shift key before you click to create the next string, then press it again to drag upwards (otherwise, all the lines will be connected!).
- You can create each letter’s strings in a separate layer if you like, as this will make moving the letters easier after creating the lines (in case you want to move them).
الخطوة 12
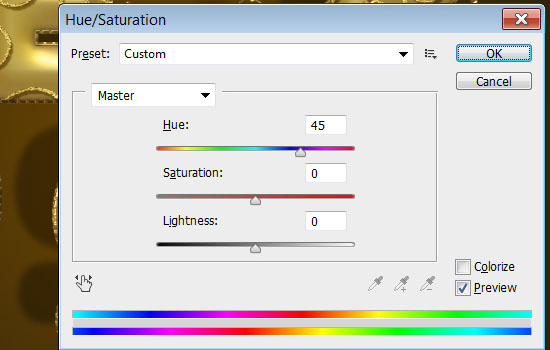
- That’s it for the text. This step is optional, and it explains how to add a nice bokeh texture to the Background.
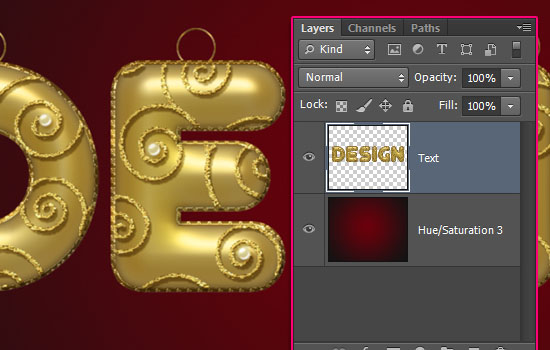
Select the “Background” layer, then go to Image -> Adjustments -> Hue/Saturation, and change the Hue value to 45.
- Place the “Xmasstree-4″ bokeh texture on top of the Background layer, change its layer’s Blend Mode to Multiply, then go to Edit -> Transform -> Rotate 90° CW. Move the texture around as you like.
- Finally, go to Image -> Adjustments -> Levels, change the Highlights value to 242, and the Gamma value to 1.36 to brighten up the texture a bit.
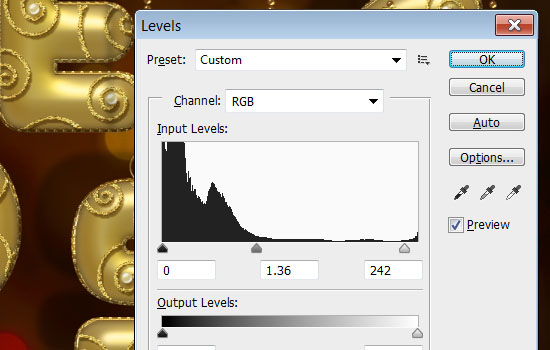
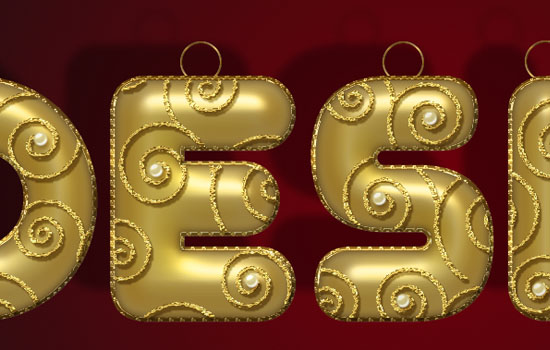
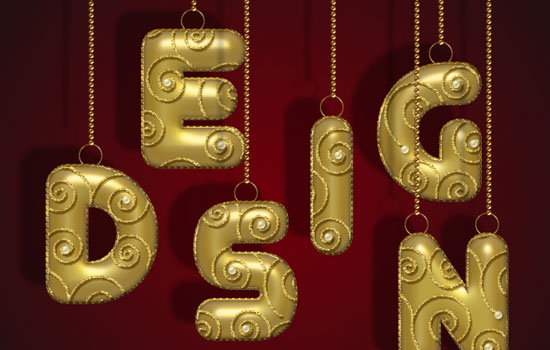
And you’re done!
Hope you enjoyed the tutorial and found the tips and tricks used helpful 
يارب اكون وفقت فى النقل


 منذ /24-12-2013, 07:54 PM


 المواضيع المتشابهه


 العرض الشجري